
Mastering Dog Nail Trimming A Step-by-Step Guide for a Happy Pup
So, you’ve decided to tackle dog nail trimming yourself. Good for you! It might seem a bit scary at first, especially if your dog isn’t a fan of having their paws messed with. But honestly, it’s a super important part of keeping your furry friend healthy and comfortable. Overgrown nails can actually cause pain and lead to other problems down the road, like issues with how they walk. We’re going to walk through everything you need to know, from picking the right clippers to making the whole experience less stressful for both of you. Let’s get those paws in shape!
Key Takeaways
- Gather the right tools before you start, including clippers or a grinder, styptic powder for accidents, and plenty of treats for positive reinforcement.
- Get your dog accustomed to having their paws handled gradually, using treats and praise to create a positive association with nail care.
- Learn to identify the quick (the pink part of the nail with blood vessels) to avoid cutting it, which can cause pain and bleeding.
- Trim nails in small, careful steps at a slight angle, and smooth any rough edges afterward to prevent snagging.
- If you’re unsure or your dog is particularly resistant, don’t hesitate to seek help from a professional groomer or veterinarian.
Essential Tools for Dog Nail Trimming

Getting your dog’s nails trimmed might sound a little scary at first, but honestly, with the right gear, it’s not that bad. Having the proper tools makes a huge difference, turning what could be a stressful chore into a pretty manageable part of your dog’s care routine. It’s all about being prepared so you can do a good job and keep your pup happy and comfortable.
Choosing the Right Nail Clippers
When you’re looking at clippers, you’ll see a couple of main types. There are the scissor-style ones, which work a lot like regular scissors and are good for most dogs, especially those with thicker nails. Then you have the guillotine-style clippers, which are usually better for smaller dogs with thinner nails. The key is to pick a size that fits comfortably in your hand and is appropriate for your dog’s nail thickness. Using clippers that are too small or dull can make the job harder and more uncomfortable for your dog.
Understanding Electric Grinders
Electric grinders, often called Dremels, are another popular option. Instead of cutting, they file the nail down. Many people like these because they can smooth out the nail’s edge, which can help prevent snagging on carpets or furniture. They can also be a bit more forgiving if you’re worried about cutting too deep, as you can grind away small amounts at a time. However, some dogs might be a little spooked by the noise or vibration at first, so it might take some getting used to.
Styptic Powder: Your Bleeding Solution
Accidents happen, and sometimes you might trim a little too much and hit the quick, which is the blood vessel inside the nail. That’s where styptic powder comes in. It’s a must-have to have on hand. If you do nick the quick, applying a bit of this powder will help stop the bleeding pretty quickly. Some people also use cornstarch or even a plain bar of soap in a pinch, but styptic powder is specifically designed for this.
The Importance of Treats and Rewards
Seriously, don’t underestimate the power of treats. Having your dog’s favorite snacks readily available is super important. You want to make nail trimming a positive experience, not something they dread. Every time you do a good job, or even just for letting you touch their paws, give them a treat and some praise. This positive reinforcement helps build good associations and makes future nail trims much smoother. It’s like a little bribe, but a really effective one!
Preparing Your Dog for a Smooth Trim
Getting your dog ready for nail trims is half the battle, honestly. If your pup is already stressed out before you even pick up the clippers, it’s going to be a tough go for everyone involved. The goal here is to make this a normal, even pleasant, part of their routine, not some kind of wrestling match. It really just takes a little bit of patience and a whole lot of positive vibes.
Creating a Calm Environment
First things first, pick a spot where your dog feels safe and relaxed. This isn’t the time to try and trim their nails while they’re hyped up from a walk or when there’s a lot of noise going on. Think quiet, comfy, maybe their favorite rug or bed. Dimming the lights a bit can also help signal that it’s chill time. You want to avoid any sudden movements or loud noises that could startle them. It’s all about setting the stage for a peaceful experience, so they associate this time with calm, not chaos. Making sure you have all your tools within reach before you even get your dog is a good move too; you don’t want to be scrambling for the styptic powder mid-trim.
Getting Your Dog Comfortable with Handling
Before you even think about clipping, you need to get your dog used to having their paws touched. Start small. Just gently hold one of their paws for a few seconds, then let go and give them a treat. Do this a few times a day, every day. Gradually increase the amount of time you hold their paw. Next, introduce the nail clippers. Let them sniff the clippers, maybe even give them a treat just for being near them. You can also gently touch the clippers to their nails without actually cutting. The key is to go at your dog’s pace. If they pull away or seem uncomfortable, you’ve gone too fast. Back up a step and try again later. It’s about building trust, and that takes time. Some dogs might never love it, but you can definitely get them to tolerate it much better with consistent, gentle handling. You can find some great tips on handling aversion at Union Lake Pet Services.
Positive Reinforcement Strategies
This is where the magic happens. Every little bit of progress should be met with enthusiastic praise and a tasty treat. Did they let you touch their paw for five seconds? Treat! Did they stay calm while you held the clippers near their nail? Treat! Did you manage to trim just one nail without a fuss? Big treat and lots of happy talk! You can even use their favorite chew toy as a distraction. The idea is to create a strong positive association with nail trimming. They should start to think, “Hey, when my human messes with my paws, I get yummy things!” This makes them more willing to cooperate next time. Remember, consistency is key. Keep these sessions short and sweet, especially at first, and always end on a positive note, even if you only accomplished one tiny step. This approach helps build confidence for both of you.
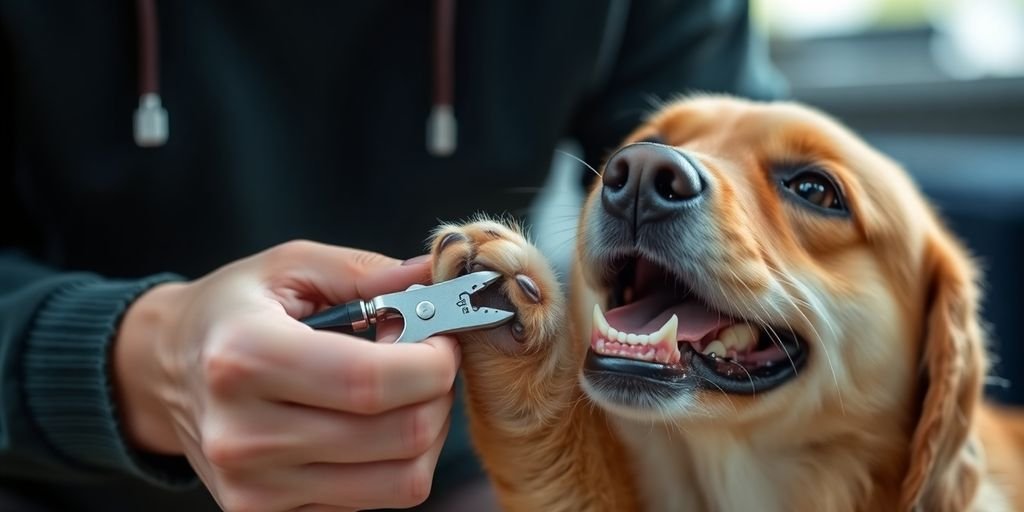
Mastering the Dog Nail Trimming Technique
Getting the nail trimming technique right is key to keeping your dog comfortable and safe. It might seem a little intimidating at first, especially if your dog has dark nails, but with a bit of practice, you’ll get the hang of it.
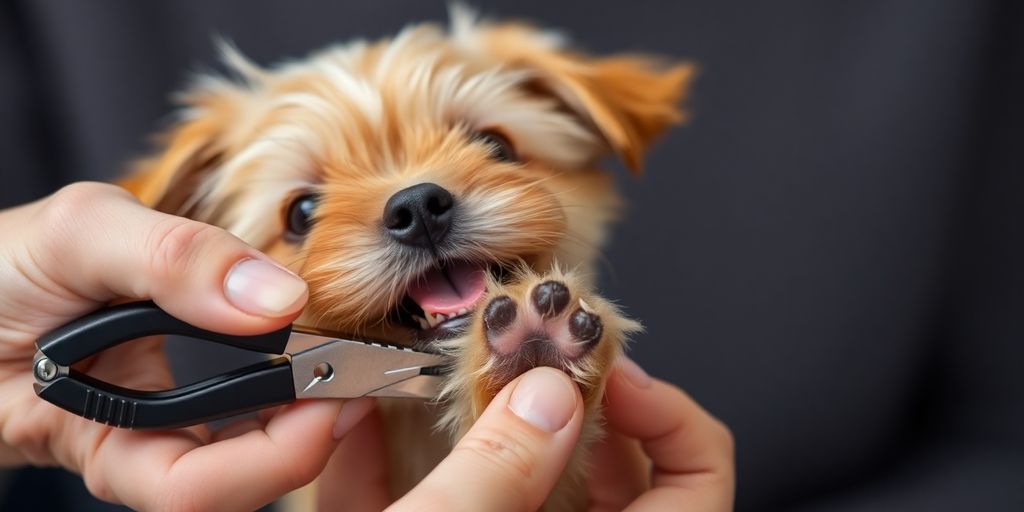
Identifying the Quick in Light and Dark Nails
The most important thing to know is where to stop cutting. That’s the ‘quick,’ which is the pinkish part inside the nail that has blood vessels and nerves. Cutting into it will hurt your dog and cause bleeding. For dogs with light-colored nails, you can usually see the quick as a pink area. With dark nails, it’s trickier because you can’t see the quick. In these cases, it’s best to trim just a tiny bit off the end, or use a grinder, and check frequently. You’re looking for a small dark circle appearing in the center of the cut nail; that’s the start of the quick.
Trimming in Small, Gradual Steps
This is probably the most important tip, especially for dark nails. Instead of trying to get the whole nail in one go, trim off just the very tip. Then, take a little break, maybe give a treat, and trim another tiny bit. This gradual approach minimizes the risk of hitting the quick. It also helps your dog get used to the process without feeling overwhelmed. If you’re using a grinder, hold it at a slight angle and grind down the nail in short bursts, checking often.
The 45-Degree Angle Approach
When you’re clipping, try to hold the clippers at about a 45-degree angle to the nail. This angle helps the clippers cut cleanly and can make it easier to avoid the quick. It also helps create a smoother cut, which is better for the nail. Remember to gently hold the paw, placing your thumb on the pad and your forefinger on the top of the toe just above the nail. This gives you better control and helps you properly position the clippers.
Smoothing Rough Edges After Trimming
Once you’ve trimmed all the nails, you might notice some sharp or rough edges. These can be uncomfortable for your dog and might snag on things. You can smooth these down using a nail file or, if you’re using a grinder, a quick pass with the grinder can smooth everything out nicely. This final step makes sure your dog’s paws are comfortable and snag-free.
Handling Unexpected Situations During Trimming
Even with the best preparation, sometimes things don’t go exactly as planned when trimming your dog’s nails. It’s totally normal to feel a bit flustered if an accident happens, but staying calm is key for both you and your pup. Knowing what to do can make a big difference.
What to Do If You Cut the Quick
If you accidentally cut into the quick, which is the pink part of the nail containing blood vessels and nerves, don’t panic. The first thing to do is apply pressure to the nail. You’ll want to have styptic powder or even cornstarch or flour on hand. Press a small amount of the powder firmly against the bleeding nail for about 30 seconds to a minute. This should help stop the bleeding. Keep your dog calm with gentle petting and maybe a favorite treat. It’s important to stop the trimming session after this happens to avoid further stress for your dog. You can always try again another day once the nail has healed.
Managing a Restless or Anxious Dog
Sometimes, your dog might just not be in the mood, or they might be feeling generally anxious about the process. If your dog starts to squirm, pull away, or show signs of distress like panting or lip licking, it’s a clear signal to pause. Trying to force them will only make things worse. Instead, try to redirect their attention with a high-value treat or a favorite toy. If they’re still too worked up, it’s best to stop for the day. You can try breaking down the nail trimming into much smaller sessions over several days, focusing on just one or two nails at a time. Positive reinforcement, like praise and treats for calm behavior, is super important here.
When to Take a Break
Recognizing when to take a break is a skill in itself. If you’re feeling stressed, your dog will pick up on that energy. Similarly, if your dog is showing consistent signs of discomfort or anxiety, pushing through isn’t the answer. It’s perfectly okay to stop mid-session. You can put the clippers away, give your dog some space, and maybe engage in a calming activity like a gentle massage or a short, quiet game. Come back to it later in the day or the next day when both of you are feeling more relaxed. Building positive associations with nail trims means knowing when to call it quits for a bit and try again when the time is right.
Establishing a Regular Dog Nail Trimming Routine
Keeping your dog’s nails at a good length isn’t just about looks; it’s a really important part of their overall health. When nails get too long, they can start to cause problems. They might make it uncomfortable for your dog to walk, which can lead to issues with their paws, legs, and even their posture over time. Plus, long nails are more likely to snag on things like carpets or rugs, which can be painful and might even cause them to break or bleed. Making nail care a regular thing helps prevent all of that.
Recommended Trimming Frequency
So, how often should you be trimming? It really depends on your dog. Factors like their breed, age, activity level, and even the surfaces they walk on can affect how quickly their nails grow. Generally, most dogs benefit from a nail trim every 3 to 4 weeks. However, some very active dogs who spend a lot of time on rough surfaces like pavement might wear their nails down naturally, needing trims less often. On the flip side, less active dogs or those who mostly walk on soft surfaces might need them trimmed more frequently. A good rule of thumb is to check their nails regularly.
Making Nail Care a Habit
The best way to make nail trimming less of a chore is to make it a routine. Start by getting your dog used to having their paws handled, even when you’re not trimming. Gently touch their paws, massage their toes, and offer a treat. Do this often, in short, positive sessions. When it’s time to trim, try to do it at a time when your dog is already relaxed, maybe after a walk or a nap. Consistency is key here. The more regularly you handle their paws and trim their nails, the more they’ll get used to it, and the less stress it will be for both of you.
Recognizing When Nails Need Trimming
How do you know for sure if it’s time for a trim? There are a few tell-tale signs. The most obvious one is the sound: if you can hear your dog’s nails clicking on hard floors when they walk, they’re definitely too long. Another sign is if their nails are visibly curling or growing into the paw pad. You might also notice your dog changing how they walk or stand to avoid pressure on their nails. If their nails frequently snag on carpets or upholstery, that’s another indicator that they’ve gotten a bit too long and need attention. Checking their paws regularly will help you get a feel for your dog’s individual nail growth rate.
When to Seek Professional Dog Nail Trimming Assistance
Sometimes, even with the best intentions and all the right tools, trimming your dog’s nails at home can feel like a real challenge. It’s totally okay to admit when you need a little extra help! There are definitely signs that point towards needing a professional groomer or your veterinarian to handle the nail care.
Signs Your Dog Needs Professional Care
It’s good to know when to call in the pros. If your dog gets super stressed out, like really wiggly and resistant, every single time you even look at the nail clippers, that’s a big clue. Also, if you’re having a hard time seeing the quick, especially with dark nails, and you’re worried about cutting too much, a professional can manage that safely. Another indicator is if your dog’s nails are already overgrown and causing them to limp or change how they walk – that’s a sign they need immediate, careful attention.
Benefits of Professional Grooming Services
Honestly, professional groomers and vets have seen it all. They’re trained to handle dogs that are nervous or have had bad experiences with nail trims before. They use specialized equipment and techniques to make the process as quick and painless as possible. Plus, they can often smooth the nails afterward, so you don’t have to worry about snagging or rough edges. It’s a way to ensure your dog’s paws stay healthy and comfortable without the added stress for either of you.
Finding a Trusted Groomer or Veterinarian
When you’re looking for someone to help, ask around! Friends, family, or even your vet can recommend a good groomer. Look for groomers who are patient and use positive reinforcement methods. A quick visit to the grooming salon or vet clinic beforehand, just to meet the staff and see the environment, can also be helpful. You want to feel comfortable with the person handling your dog’s paws, and your dog should feel safe too. Checking online reviews can also give you a good idea of their reputation.
Wrapping Up: Happy Paws Ahead!
So, there you have it! Trimming your dog’s nails might seem a little scary at first, but it’s totally doable. Remember to take it slow, use the right tools, and always have some tasty treats ready for your furry pal. Making nail care a regular thing helps keep your dog comfy and healthy, and honestly, it gets easier with practice. If you ever feel unsure or your dog is just too wiggly, don’t hesitate to ask your vet or a professional groomer for help. They’ve got tons of experience and can show you the ropes. Here’s to happy, healthy paws and many more adventures with your pup!
Frequently Asked Questions
How can I tell if my dog’s nails need trimming?
You’ll know it’s time to trim your dog’s nails when you hear them clicking on the floor when they walk. If their nails frequently get caught on carpets or furniture, that’s another sign they’ve gotten too long.
Can I use my own nail clippers on my dog?
It’s best to use clippers made specifically for dogs. Human nail clippers aren’t shaped right and don’t have the strength needed to cut a dog’s nails safely and effectively.
How do I make my dog less scared of nail trims?
Start by getting your dog used to having their paws touched. Let them sniff the nail clippers and give them treats for staying calm. Doing short, regular sessions helps them feel more comfortable over time.
What should I do if I accidentally cut the quick?
If you accidentally cut the quick, don’t panic! Just press some styptic powder or cornstarch onto the nail to stop the bleeding. Comfort your dog afterward.
How often should I trim my dog’s nails?
Trimming nails every 3 to 4 weeks is usually a good idea. However, this can change depending on how fast your dog’s nails grow and how much they wear down naturally from walking.
When should I get professional help for nail trimming?
If your dog gets very stressed or fights the nail trimming, or if you’re just not comfortable doing it, it’s a good idea to ask a groomer or your vet for help. They can trim the nails for you and show you the best way to do it.